Wednesday, October 16, 2013

Non-writing Kindergarten Math Assessment

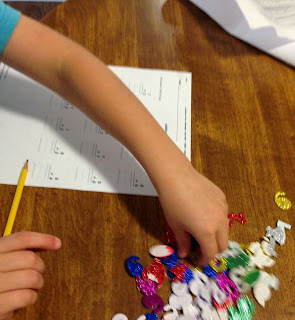
A few weeks ago, I wrote about the Addition at the Fridge we have been using to practice math.  Once my son was showing a reasonable level of mastery, I put together this simple assessment.  I wanted to have something that I could file to showcase the level of achievement he has obtained.

The assessment itself was printed from Handwriting For Kids. Yes, that is a little ironic.  I will definitely be using this site again in the future.  It took only a few minutes to choose the number of problems, and the range of difficulty and hit print,easiest assessment writing of my life.  I picked up some number stickers at the dollar store, which he could use to record his answers.  Since I wanted to know what he could do from memory, the abacus was not part of this activity.


I was pleased with the results, and my son is hoping for a quiz again soon!


Tuesday, October 15, 2013

Toy Car Distance Investigation


The final activity in my Toy Car Physics! unit is an experiment involving force and resulting distance on a toy car.  To be frank, this was a little bit of stretch for my three and five-year-olds.  They did enjoy it though, and got some great practice with numbers.

We tried out two apparatuses.  My son used his hotwheels launcher.  This approach requires that the student basically understand the force of gravity. Many kids do by kindergarten, but for those who do not, it would create an unnecessary hassle.  The key is to understand that by launching the cars from lesser heights, you are limiting the time that gravity has to exert the force, therefore there is "less force" on the car. To be precise, you would say that there is less work done by the force.

My daughter used a rubber band powered launcher created by my husband.   It consists of two screws in a board.  We were able to add more and more rubber bands in order to exert more and more force on the car. The results were nicely quantifiable.


However, before we started anything, they had to make their predictions.  I wrote down their verbal hypothesis, and they drew pictures of the effects of little and big pushes.


Each child had the opportunity to launch the cars with three different sized forces.  Then, we measured the distance between the launch point and the point where the car stopped.  For us, this was a fun way to practice reading numbers larger than twenty.


As we worked, we recorded data in the pre-made data table.  When we were finished, we moved it to a graph. 

 We obtained very nice results with both set ups.  By nice, we I mean that when more force was used, more distance was achieved.  That was the standard result and the physics concept I was hoping to reinforce.


This wraps up my Toy Car Physics!  unit.   I hope it gives you some ideas about what can be done to meet some of these science objectives.  If you would like access to these hand outs or more detailed information about how these activities line up with Next Generation Science Standards or Common Core, please click here to download the file from my TpT store.

Learning science is naturally fun for most kids, because it requires them to do the same things they would naturally do when playing with toys.  As a mom, I love to enjoy life with my kids.  As a physics teacher, I appreciated every bit of groundwork that was laid before students walked into my classroom.   Admittedly, my experience in teaching science to large groups of elementary students is limited, so if you are an experienced classroom teacher with observations or concerns about how the activities in this unit would work in a standard class, I would love to have your input.

Tuesday, October 8, 2013

Toy Car Negative Acceleration Investigation Demonstration (Slowing down cars and showing my students how to do an experiment.)

This activity has two goals.  First, to demonstrate the idea of a force that causes negative acceleration, also known as deceleration or slowing down.   The second purpose was to model the concept of how to do a data chart with numbers, and how to graph numeric data. My children's response startled me.

The set up calls for markers, arranged in a line, and a toy car.  I rolled the car into the row of markers slowly, so that only one marker fell down.  It took one marker to stop a slow car. 


On my data sheet I wrote "slow and "1".  Next I rolled the car at a medium speed, about what I expected to knock down half of the markers.  It took three markers to stop a car from medium speed.  I wrote "medium" and "3". on my data sheet.  I repeated with a fast car.


Next, I hand drew a simple graph representing my data.  I thought that was the end of the lesson.  My intention was to have my kids apply these skills on our final experiment.  I set them free to enjoy knocking down the markers with the car.


A few minutes later my graph had new data.


A few minutes more passed, and I was asked to assist in numbering this master piece.


Real data tables and graphs are done either freehand, or later, on computer.  After seeing my children's enthusiastic response, I am convinced that this is a better way to introduce graphing than through graphing on a pre-done graph.  My final experiment does use a pre-fabricated graph, and my children compliantly followed directions, and where then happy to move on.   

This combination of demonstrating the experiment, with data table and graph, then setting my children free to re-create what I had done worked astonishingly well.  I would love to see how it would work in a standard classroom.  Would you use it as a station activity?  If anyone has the class and the will to try it, please let me know how it goes!

This lesson is part of my new unit Toy Car Physics!  Click here to check out the other activities.


Saturday, October 5, 2013

Covering Kindergarten Common Core with Questions


My son loves to listen to books, and looks forward to our daily reading time.  Now that we are working on kindergarten, I am using questions during reading time to cover Common Core objectives.  Tonight I need to figure out what we have done and what we need to to do.  Here is the list of questions we have used or will use to finish covering Reading and Literature objectives.


Read more about this book by clicking here.

Reading: Literature


Tell me about [key details in the text]. (RL. K.1 )
Now that I have read this story to you, you tell it to me. (RL. K.2)
Who is the most important character in this story/poem?
Who else is in this story/poem?
Where did this story happen?
What happened in this story/poem ? (RL.K.3)
What do you think the word [unknown word from book] means? (RL.K.4)
What words from this story/poem are new to you?  (RL.K.4)
What kind of book is this?  (RL.K.5)
Who is the author of this book?
What does it mean to be the author?
Who is the illustrator of this book?
What does the illustrator do? (RL.K.6)
What is happening in this picture?  (RL.K.7)
How is this story like [another story read recently]?
How is this story different from [another story read recently]?

(Actively engage in group reading activities with purpose and understanding,  RL.K.10)

Read mroe about this book by clicking here.

Reading:Informational Text


Tell me about [key details in the text]. (RI. K.1 )
What is this book about?
What are the most important things to know about [main subject of the book] (RI.K.2)
What does [person, event, idea, fact] have to do with [second person, event, idea, or fact]? (RI.K.3)
What do you think the word [unknown word from book] means? (RI.K.4)
Show me the front cover of this book.
Show me the  back cover of this book.
Show me the title page of this book. (RI.K.5)
Who is the author of this book?
What does it mean to be the author?
Who is the illustrator of this book?
What does the illustrator do? (RI.K.6)
What is happening in this picture?  (RI.K.7)
Why does the author say [point made in the text]?  Note:  The reasons should be derived from the text. (RI.K.8)
What other book have read recently on this topic?
How are [two books on the same topic] the same?
How are [two books on the same topic] different? (RI.K.9)

(Actively engage in group reading activities with purpose and understanding, RI.K.10)

Italics mean that this question is the same for both literature and informational texts.

In addition to our reading times at home, my children participate in a reading time at our local library our home school co-operative.  These extra activities give them some opportunity to engage in group reading activities  as per RL.K.10, and RI.K.10.

Now that I have made my list, I will choose six or so of the questions that we have not thoroughly covered, and write them on an index card and place the card on the kids' bookshelf to remind me what I need to be asking during Monday's reading time.


Are there other questions you would use during reading time with a five-year-old?


Thursday, October 3, 2013

Measuring Length


This week, I have been posting about my new physics unit for kindergarten through second grade.  Before we jumped into the final investigation, we needed to learn a new skill, measuring length!

I prepared a simple presentation that demonstrates how to measure correctly.  You can access it along with the other free materials that support this unit by accessing my Teachers Pay Teacher page.  I kept my explanation to a simple, three-step process.  Line up the zero with one edge of the object, read the number on the other edge of the object, add the appropriate units.  

This is a great time for tactile practice.  My son entertained himself for over twenty minutes measuring objects around the house.  He was still working on nomenclature, so that was the skill we reinforced.  Older students could work on fractions or decimals as they find left over halves or 0.5's.  We made verbal notations of the measurements, but students who are comfortable writing could easily make a list of objects and their lengths.

The opportunity to work with a real tool is the key to student engagement in this lesson.  If I was a working with a classroom, I would keep my eyes peeled at yard sales for interesting measuring implements.  For a faster solution, you might consider some little tape measures like these. 

  As a high school physics teacher, one of my favorite amusements was watching students who had believed themselves to be less intelligent than their peers discover that they were good at one of the most difficult sciences.  This activity is a similar opportunity for younger students who may struggle with paper and pencil style work.  Hopefully, the motivation spills over to other subjects.


Wednesday, October 2, 2013

Toy Car Story Play


We followed our toy car direction investigation with a simple story telling activity.  Each child got a piece of poster paper and access to markers.  They were instructed to draw a scene that they could use to tell a story with a car.  After the restrictions of the previous activity, they welcomed the creative freedom. Since neither of my children is writing independently yet, they narrated the story while driving the car around their scene, and I wrote it down. 

 The process of them telling, me repeating back, and them telling some more, will hopefully turn into creative writing one of these days.  In the mean time we got some fine motor practice and some speech practice.

My idea was that older students could write down their own stories.  Perhaps small groups could perform their stories in the form of skits.  

Two activities were enough for us to call it a day, but we did pick up with measuring a few days later, and finish with one more major investigation.


Tuesday, October 1, 2013

Toy Car Physics! A playful unit aligned with the Next Generation Science standards

This unit was designed to give kindergarten through second grade teachers some fun ideas about how to approach the Next Generation Science Standards K-PS2-1 and K-PS2-2.  Respectively, these standards read:

Plan and conduct an investigation to compare the effects of different strengths or different directions of pushes and pulls on the motion of an object.

Analyze data to determine if a design solution works as intended to change the speed or direction of an object with a push or a pull.


Drawing from my background as an AP physics teacher, I used my own kids to test my projects.  We had fun, and I hope you and your students will too.  

If you would like to download the supporting documents, they are available on my Teachers pay Teachers page for free.  (Click here to go to my Teachers pay Teachers page.)

Click on the following links to learn more about how we enjoyed each activity.


If you do decide to try one of these activities, please do let me know how it went for you.  This is my first attempt at elementary unit planning, so constructive feedback is especially welcome.


Toy Car Direction Investigation

This is the first activity in my unit, Toy Car Physics! Our purpose in this activity was to practice documenting our discoveries, and to cement the relationship between the direction of  force (aka a "push" or "pull") and the resulting movement.  

Before we started, I marked a sheet of poster paper with four directions: back, forward, left, and right.  I showed the paper to my kids and explained that we were going to push and pull a toy car along the paper.


Next, I gave them their data collection sheets, with a matching picture.  Since my kids are both still early readers, I had them circle the word in the picture that matched the word in the sentence.  Then, I prompted them to color in the arrow that they felt represented the direction the car would go when pushed or pulled in that direction.  The example shown is of the expected answer, but I was surprised at how often they chose an unexpected answer.


Finally, I let them try pushing and pulling their cars of choice along the grid on the floor.


They marked their answers on the observation sheet, in exactly the same way they had marked their hypothesis earlier.


Once they had finished their investigation and marked their observations we discussed how their two sheets compared, and what we could conclude from our experiments.

My major surprise with this activity is how challenging they seemed to find it, however they completed it happily.

If you would like a copy of the worksheets pictured above, you can download them for free from my Teachers Pay Teachers Page.   (Click here to go to my Teachers Pay Teachers Page.) We continued this unit with some toy car story play.

If you do try this, please let me know how it goes with your students!